Tuesday, July 29, 2014

Catch Up Post

Life has bee hectic and full all at once!  Sometimes that has been awesome and sometimes it's been dog gone awful! But I'm grateful for both! I've completed a lot of projects for my classes and some just for my pleasure. I'll quickly share some of these here with you, before I create my next blog post, which in some ways is a kind of anniversary.

Steampunk Tags


Glass Jar with Pins


Cards


Layouts
I've also made a bunch of layouts, but darn if I can find the pictures as I sit here in Atlanta!

Mini Books
I'm afraid that I'll have to share these separately!

Hope you enjoyed and please stay tuned!

Have a happy scrappy day,
M-C

Monday, May 05, 2014

It's a Really Big Tag!

I recently joined a Facebook group called CreateExchange and this is my first swap with them!  I'm always interested in swapping, but I'm not a big fan of making multiples of the same thing, so one on one swaps suit me better!  Please feel free to let me know if you are interested in swapping with me! We can swap tags, mini albums, a small altered canvas, or something else that might make us both stretch our creativity!
 
The tag for the CreateExchange swap needed to be at least 4"x10" and the theme was Flowers. Easter and/or Butterflies. Here is what I came up with!


  • The tag base is chipboard that I covered with paper from the Marion Smith Nirvana collection.
  • I layered some turquoise jute that I bought at JoAnns in the flower department.
  • I purchased the doily a few years ago I think at Homegoods.
  • The flower center is a bead that I found on sale at Michael's a couple of weeks ago.
  • The flower layers are a mix of petals from Prima and Recollection.
  • The stick pins are made on 4 inch pins and the beads were collected over time.  


  • The saying is stamped with Coffee colored Archival Ink using a Tim Holtz stamp.  I also used a couple of Distress Ink pads to colo r the background.
  • The silver butterflies are Recollections.  They were first colored turquoise with one of my Spectrum Noir pens and then covered with a Zig Silver pen. A little stickle to give them some more shimmer and voila! 
  • The flat back pearls I bought, I think from MB Treasurista's a few years ago!  I bought a whole big roll, so I still have some left!
  • The silver and turquoise embellishment is from a bag of Spare Parts I purchased at Hobby Lobby.
  • The butterfly between the rows of pearls was made using modeling paste and a stencil I bought from SaCrafters. I used a Spectrum Noir pen to give it a touch of turquoise.


  • I bought the lace at an antique mall in Waynesville, OH last summer. It is an unusual shade of  greyish beige that is a fairly warm tone, for a beige, and works well with just about any shabby chic/antique stype project.
  • The silver butterfly I got at Michaels. I shaped it and gesso'd the body then stickled it. It rests on a chipboard butterfly also from Michael's which I painted with a light coat of beige and then rubbed with some turquoise distress ink.
  • You can see that I added a layer of turquoise ribbon under the antique lace bow.
 
 
  • I wanted to give the tag a bit more dimension, so I dangled a bigger butterfly from the tag. I purchased this wood butterfly from Michael's.
  • I used Americana paint to color the butterfly.
  • I'm not quite sure where I purchased or got the silver butterfly, but I thought it brought in the silver elements from the main tag quite nicely!


I hope you enjoyed seeing this project, and that you will return to see what else I've got up my sleeve!
 
Thank you so much for stopping by! Please do leave a comment (one that pertains to this tag or this blog directly) to be entered in a future drawing!
 
Have a wonderfully creative day,
M-C


Monday, April 28, 2014

Graphic 45 Carousel

I worked on this for a long time.  First, let me just say that this is the third project in my JoAnn's wood gazebo series. The first was the Secret Garden Gazebo and the second was the Bohemian Bazar Tiki Hut.
There is one more to come.

The carousel is by far my biggest ever project. It measures a bit over 18 inches high, by 13 inches wide. It breaks down into two main pieces. The carousel itself and the big hat box.

You already know that it all started with the wood gazebo that holds the roof up.  The gazebo sits on a hexagon shaped box that I've altered. The box sits on a 12" wood plate that I got at Hobby Lobby. The 3D horses and the bench are attached to a lazy Susan that is screwed into the wood plate. That whole structure sits on a big round box that I altered to match. I'm not sure what made me think of a Merry-go-round, but there it was twirling in my head and needing to be created! To get a real sense of how it all works, you might want to watch the video imbedded towards the end of this post.
Finding the 3D wood carousel horses took weeks and weeks of looking on the web. I eventually found not one, but to sets of vintage, unpainted Christmas ornaments that fit the scale. I'd looked at so many carousel's by then, that I was able to sit down one day and just paint each horse out. I'm pretty happy with how they turned out, given that they are a combination of the designs in my head! Those 3D horses were just the beginning of the process. I needed more animals, so I started looking again.


After many hours, or is that weeks of research, I found an Etsy shop called Nana's Little Nest. Cindy creates laser cut wood pieces and thrives on customized projects. After first buying a few pieces of her horse, I emailed her again about different sizes and different animals.  We collaborated on 3 different sizes including the ones you see here and while she will still make the various carousel/Christmas ornament animals, they will be sold exclusively from my online store.
Painting, papering and decorating the whole structure took quite a while. In the end, the hexagonal box can be opened to save items like the baby's hospital bracelet, lock of hair, etc. I envision the big box to hold a birth announcement, invites, small treasures, as well as cards he or she receives. Here are a few more pictures.


I think you can see from this last picture that I used two of the wood elephants to make the bench.  I'd like to share the video I made, so that you can see how the carousel moves!


Hope you enjoyed this project,
I wish you a wonderfully happy crafty day,
M-C

Tuesday, April 22, 2014

Graphic 45 Altered Frame

I wanted to make something a bit different, with items easy to get at Michaels, JoAnn's and Hobby Lobby.

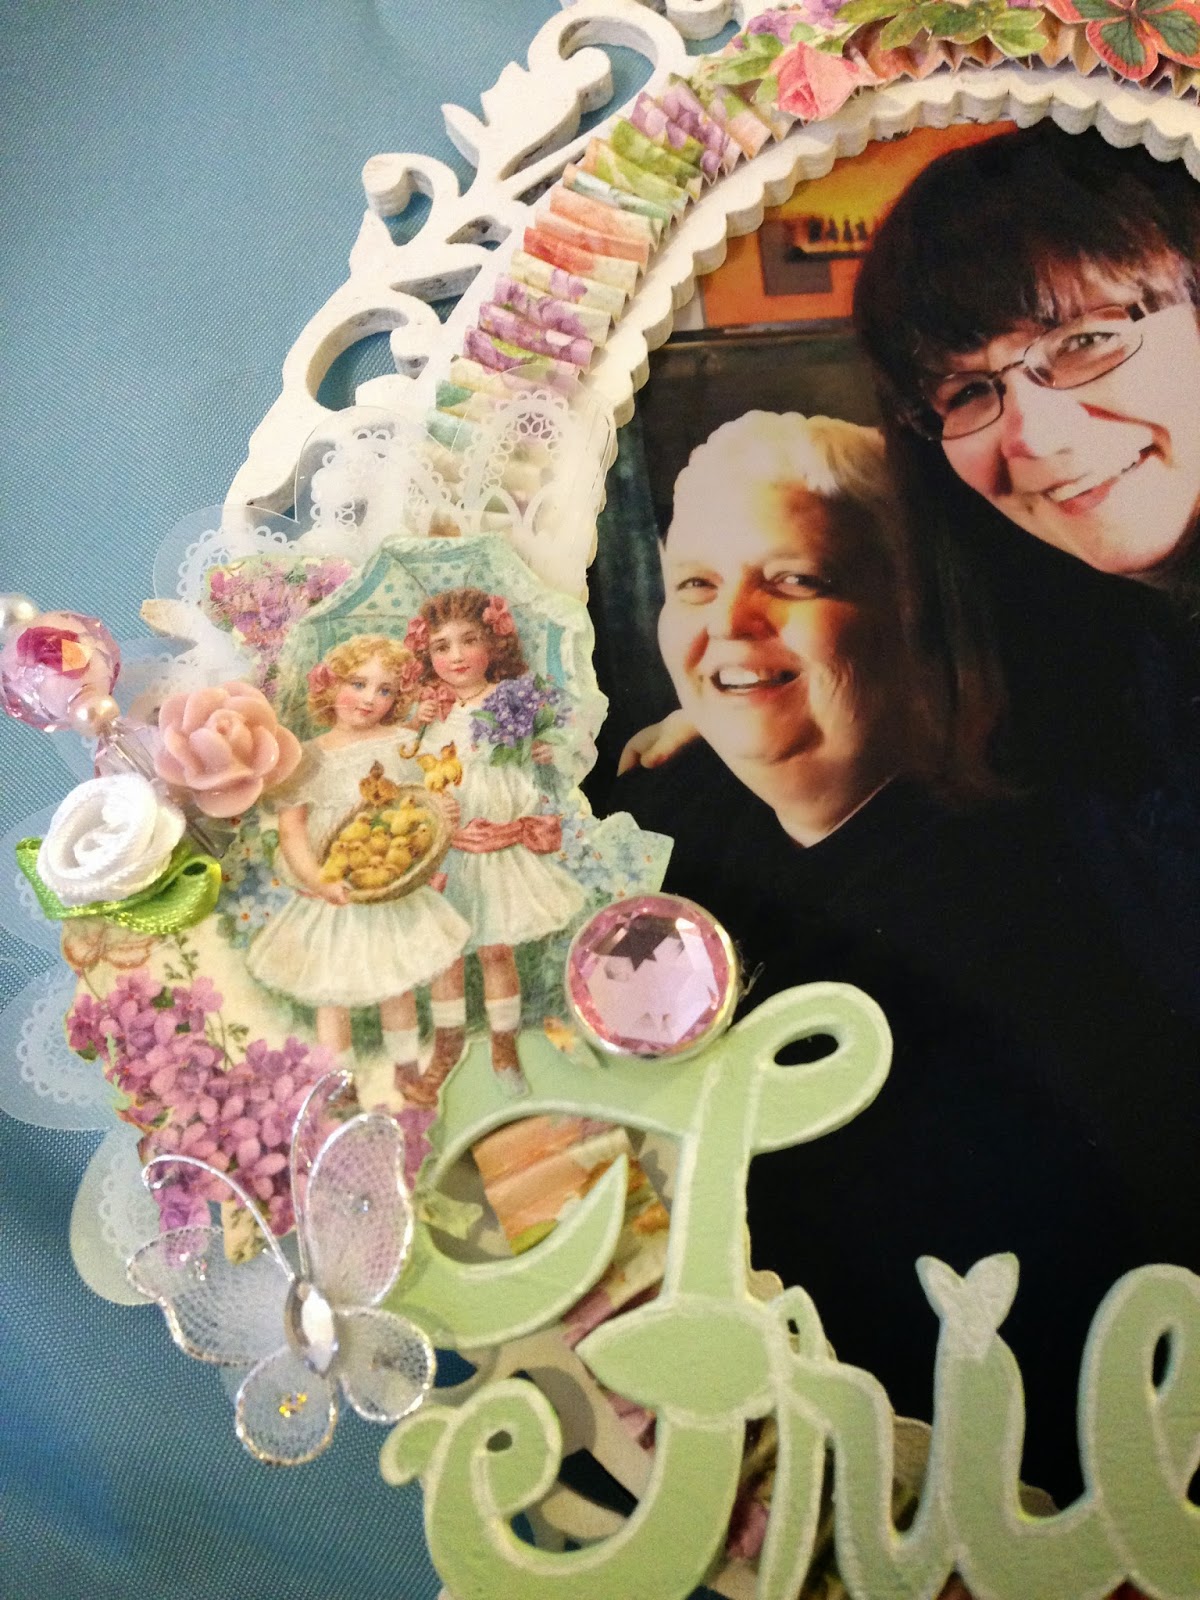
I bought the wooden frame and the wooden Friend's sign at Michael's and then gesso'd both.  I painted the frame white and the Friends sign a light green.  Then I took a white paint marker and added detail to sign to make sure that the Friends stood out.

I used the Sweet Sentiment collection from Graphic 45 to decorate the frame.  My biggest challenge was how to create an oval that conformed to the frame using the paper. 

After three attempts at a flat ring of paper, it occurred to me that it might work far better to score the paper and then score it and fold it at 1/8". 


A lot of work, but don't you think it came out just right?


I also fussy cut the two girls and the roses to use as the main decorations. I used part of an acrylic doily, I believe they were Cosmo Cricket (but don't quote me on that) to support the embellishments on the left of the frame.


I added a stick pin I'd made, some fabric and acrylic flowers.


That's my lovely, sweet friend Charlene with me. Hope you enjoyed! This really is a fairly inexpensive present and with pictures of you and your kids, it would be a great mother's day present!

Here is the video! 


 Have a happy crafty day, and see you soon!  I do have more to show you! :)
M-C


Monday, April 21, 2014

Layouts Anyone?

I've prepared  three, two page layouts for a class that I'll be giving soon!  I used the Simple Stories Homespun collection to create the layouts, combined with some white doilies that were misted with a Lindy's Stamp Gang's Starburst spray to make they shimmery and red! 


You can click on the pictures to see a bigger version!

Here is the video:


Have a happy scrappy day and don't forget to comment for your chance to win my next giveaway prize!

M-C

Friday, April 18, 2014

It's Really Been that Long???

I can't believe I've been away from my blog and YouTube channel for so long! What can I say but the obvious! I've neglected the sharing part of my craft!  I have created a lot of stuff since my last post, I've just not blogged or made videos!  I would promise to do better, but I'm not sure how well I'll keep the promise, so I'll just tell you that I aim to do better!

I've taught two card classes this year with 5 cards each. Here is the first batch:


Here are some of the fun things I used on the cards! I used the Tim Holtz decorative strip "Spring Greenery" to create the "Thinking of You" card. I must tell you that I'm not a fan of these dies!  Maybe it's me, but I can never get them to cut right!  Very disappointing!
 
I used Diemond Dies to make the Happy Birthday Banner card.  I can't remember exactly how many there are in the set, but it is something in the order of 8 or 9 dies that nest together.
 
 For the Christmas card I used one of the Graphic 45 papers from the 12 Days of Christmas collection.
 
I used the cloud dies from My Favorite things to make the Baby shower card.
 
Lastly and I used multi-colored polka dotted washi tape on the top and bottom of the Cupcake card to enhance it.


Here is a picture of the cards for my second class:


The Christmas card was made using the Sizzix Tim Holts Die and Stamp set and was colored using my Spectrum Noir pens.

The chicks and the bunny in a cupcake used on the Easter cards is from Cottage Cutz.

The banners on the baby card are from My Favorite Things.

I got everything to make the masculine birthday card at JoAnns, corrugated cardboard and plus paper and embellishments from My Minds Eye.

I just posted a You tube video showing a bunch of Easter cards including the two shown in the picture above!


Hope you enjoyed!  Happy Easter! And expect to see me post another article in the next couple of days!

M-C


Monday, November 25, 2013

Just a Mad Tea Party Pot!

I know, this project is weird for two reasons!  First, I hate tea and second it is so expected to make a Tea Pot mini album when using Marion Smith's Mad Tea Party collection! But what can I say, it is just what popped into my head and it looked so cute, I just had to make it!


My first thing was to go and find the right teapot mini.  I know that I could have made one from scratch but after I saw SaCrafter's I just had to go with that! Isn't it cute??

Here are a few pictures of the inside pages!


As you can see there are loads of places to add pictures and journaling including in the mini, within the mini!

Hope you like it!

M-C